Faux Mulberry
When I first started stamping and scrapbooking
many years ago, mulberry paper was the *in* thing. In fact, I still have a lot
of it in various colors, but I wanted to see if I could recreate the look of it
using ink. This technique was created for the purpose of creating the look of
mulberry paper beneath a focal block using ink.
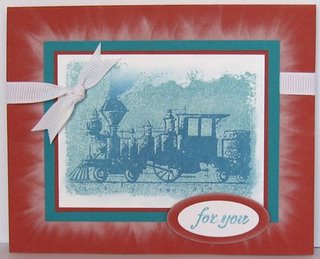
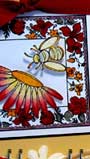
In the picture below and depending on your
monitor, you may be able to see some lines that I lightly drew in pencil to
approximate the placement of my focal block (the matted train). I followed the
edge of this line and used a sponge dauber and Craft White ink to fan outward
toward the edges of my card base. In other words, ink up the dauber and start on
the inside edge of the pencil line and swoosh/flick the sponge dauber outward.
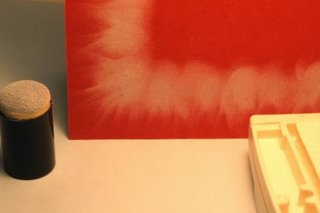
The thick and creamy characteristics of the craft
ink allow you to move the ink around without absorbing instantly into the
cardstock. This would also be a great technique to use around candles,
stars, fireworks, or campfire stamps! Can you think of any others?
:)
Additional card details -
Stamps: Happiness is a Journey, sentiment from Fresh Cuts
Paper: Whisper White, Taken with Teal, Riding Hood Red
Inks: Versamark, Baja Breeze, Taken with Teal, Craft White
Accessories: Clear embossing powder, heatgun, sponge daubers, white grosgrain
ribbon, SU punches - 1/4 inch circle, small and large ovals
|
|
 |